Add to Visit ID Functionality (New Visit ID for Exported Visits)
Overview
(Requires configuration)
In some situations, particularly with Tellus, there may be times when you need to send a visit with a new visit ID. This is typically because the original visit was rejected and the destination system is no longer accepting updates for that visit. In order to bill that visit, the visit must be sent through with a new ID. One way to create a new visit ID is to simply cancel out the old visit in Ankota, then create a new one. This can be a lengthy process due to the requirement to back out billing and payroll.
A faster way to do this is to use the Add to Visit ID button in the Visit Approval Dashboard. By clicking this button, you add a letter to the visit ID, which causes the destination system to treat it as a whole new visit. See below for more on this process.
Using the Add to Visit ID Button
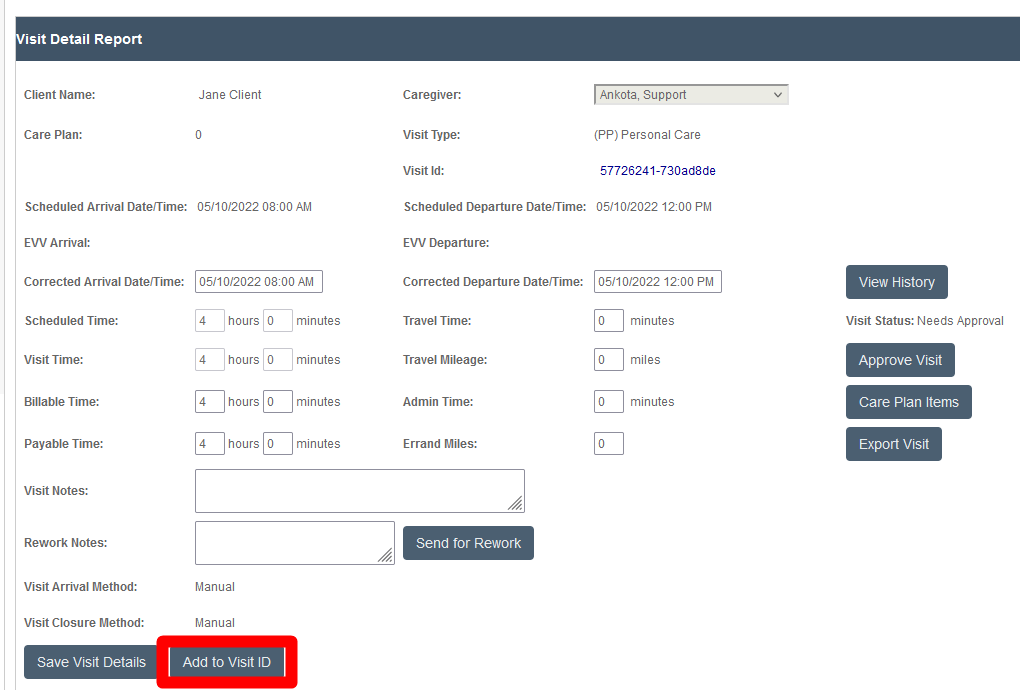
The critical parts to understand are that a) you must ensure there isn't a conflicting active visit in the destination system and b) by adding a single letter it is treated as a new visit. The ID is adjusted on the Visit Approval Dashboard by clicking the Add to Visit ID button.

More specifically, here is a walkthrough:
- If you would like to send the visit again with a new ID but the same visit data, first identify the error that caused the visit to fail
- This is typically the case when a visit is denied in Tellus; check the error before proceeding
- Make the correction in Ankota
- Reason codes can be adjusted without backing out billing/payroll
- Most demographic data can be corrected without backing out billing/payroll
- Wrong client, caregiver, date, or duration typically require backing out billing/payroll
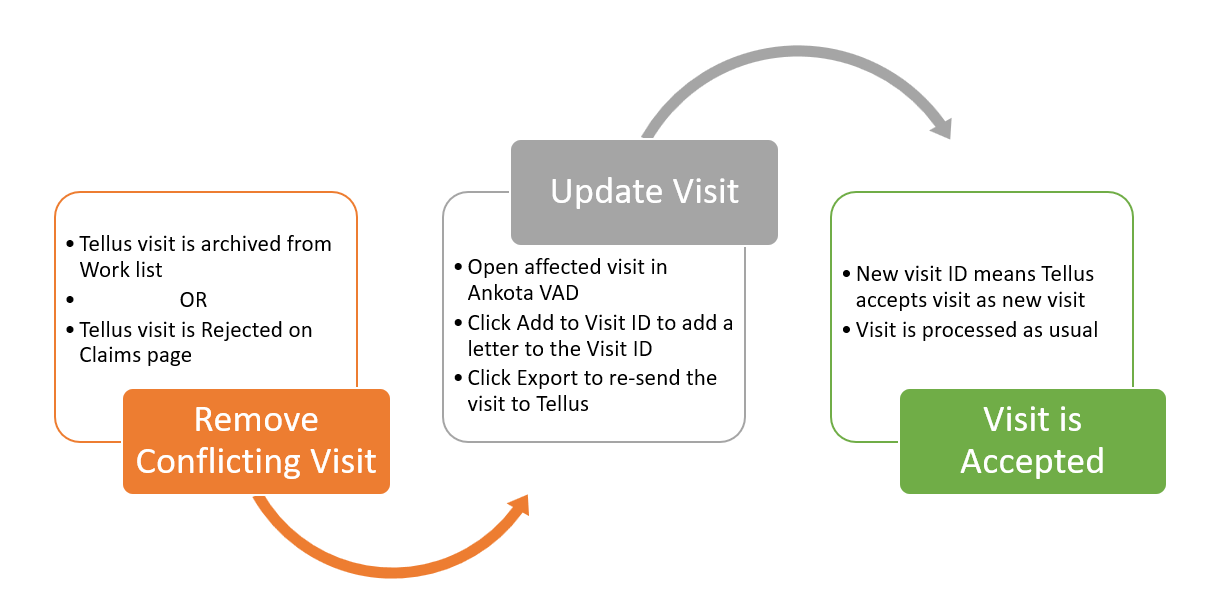
- Make sure there is no visit in the destination system (Tellus, Sandata, etc.) that will conflict with the new one you are going to send from Ankota
- If the visit is in the Tellus Work List, archive the visit
- If the visit is rejected in Tellus Claims, it’s effectively archived
- If the visit is in Tellus, make sure the rejected visit is reduced to 1 minute to avoid authorization issues
- Assign a new visit ID
- Open the visit in the Visit Approval Dashboard
- Click the Add to Visit ID button
- Click the button
- A character will be added to the end of the visit ID

- Re-send the visit via batch export (move invoice to draft/back to complete) or individual visit export (press export on the VAD)
- Please note sending the visit is a separate function from changing the visit ID
- The visit will now be accepted as a NEW visit because it has a new visit ID (the one added/changed letter causes it to be treated as a whole new visit)
- Process the visit as usual

- Once it is matching, Release the claim to be billed
- Then watch the claim in the Claims section as usual
Sample Workflow in Tellus
First, correct the issue that caused the visit failure. (If you do not correct the error that caused the initial rejection, sending the visit with a new ID will result in a second failed visit.) Then proceed to the steps below.

