Eligibility Checks for Insurance Coverage
Overview
Eligibility checks for insurance can be done through a 270 file, a client eligibility query file, which can be turned on in environments if desired. After downloading the 270 from Ankota, the file can be uploaded to a Medicaid state portal and a 271 (client eligibility status file) will be returned to the user. Then the 271 file will be uploaded into Ankota and the client's eligibility can be reviewed.
NOTE: In some states, you will need to sign a Trading Partner agreement with your state Medicaid office in order to have access to upload the 270. (You probably already have one in place if you upload 837s to your state portal.) See your state workflow for details.
This article includes the following sections:
Configuring an Eligibility Check
Building the Eligibility Check (270)
Uploading an Eligibility Check Response (271)
General Process
PREP
- Confirm you are set up by Ankota to create 270s and receive 271s
-
Set up a trading partner agreement if you need one
- Typically you can contact your state Medicaid portal support team to request one, or you may find it under your MMIS's "HELP" section
-
Run the test if one is required (required in MO)
-
MO
- Log in to eMOMED: Access the eMOMED website and log in with your credentials
- Navigate to File Management: Once logged in, select the "File Management" option
- Manage Test Files: Within File Management, choose "Manage Test Files" to upload your 270
- Upload Test Files: Select the appropriate test files from your system and upload them to eMOMED
- Verify Response: Check the response file to ensure your test files were accepted and processed correctly
- Contact Help Desk: If test files are accepted, reach out to the eMOMED help desk to move your account to production status
-
MO
LIVE PROCESS
-
To download the 270 claim eligibility query file from Ankota,
- Click Scheduled
- Click Check Client Eligibility
- Click Generate 270 Eligibility Request
- Save to Downloads (or other preferred location)
- See section below for download visual
-
To upload the 270 from Ankota to your state portal,
- Go to your state MMIS, such as EMOMED or https://www.njmmis.com
- Upload the 270 file in the file management section
- Download the 271 response when available
- Note in Missouri this response is specific to the user who uploaded the 270
-
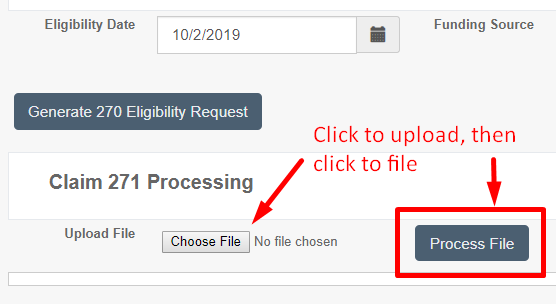
Finally, to upload the 271 you received from the state to Ankota,
- Click Scheduled
- Click Check Client Eligibility
- Click Browse
- Select the 271
- Click Process File
- View the response below (on the Ankota Check Client Eligibility page)
- Download the file if desired (Excel format recommended)
- View client status
- See section below for upload visual
Further Details
Configuring an Eligibility Check
To ensure payers are linked to the 270 file, a superuser or Ankota specialist should configure the eligibility check.
This can be done as follows:
- Go to Settings
- Click Services Settings
- Click Payer
- Click on a visit type
- Check the box next to Include in claim 270
- Do this for all payers as needed (private pay or grant funding would not be needed, for example)
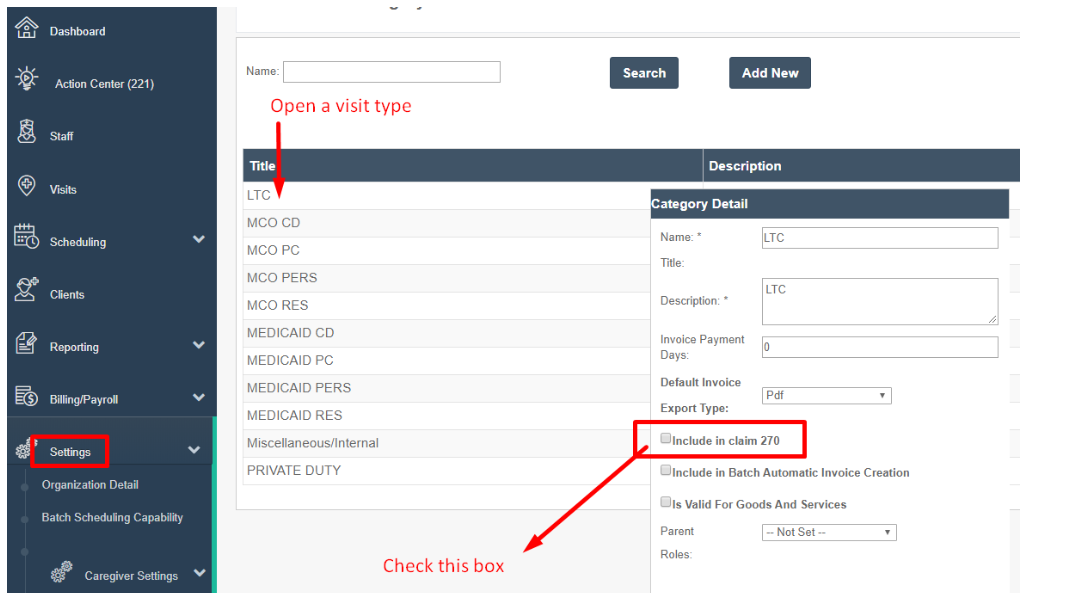
Once payers have been linked to the 270, you can access the report as needed.
Building the Eligibility Check (270)
To build the 270 report,
- Click Billing/Payroll
- Click Check Client Eligibility
- With the correct Eligibility Date entered and Funding Sources checked, click the Generate 270 Eligibility Request
- Download the file
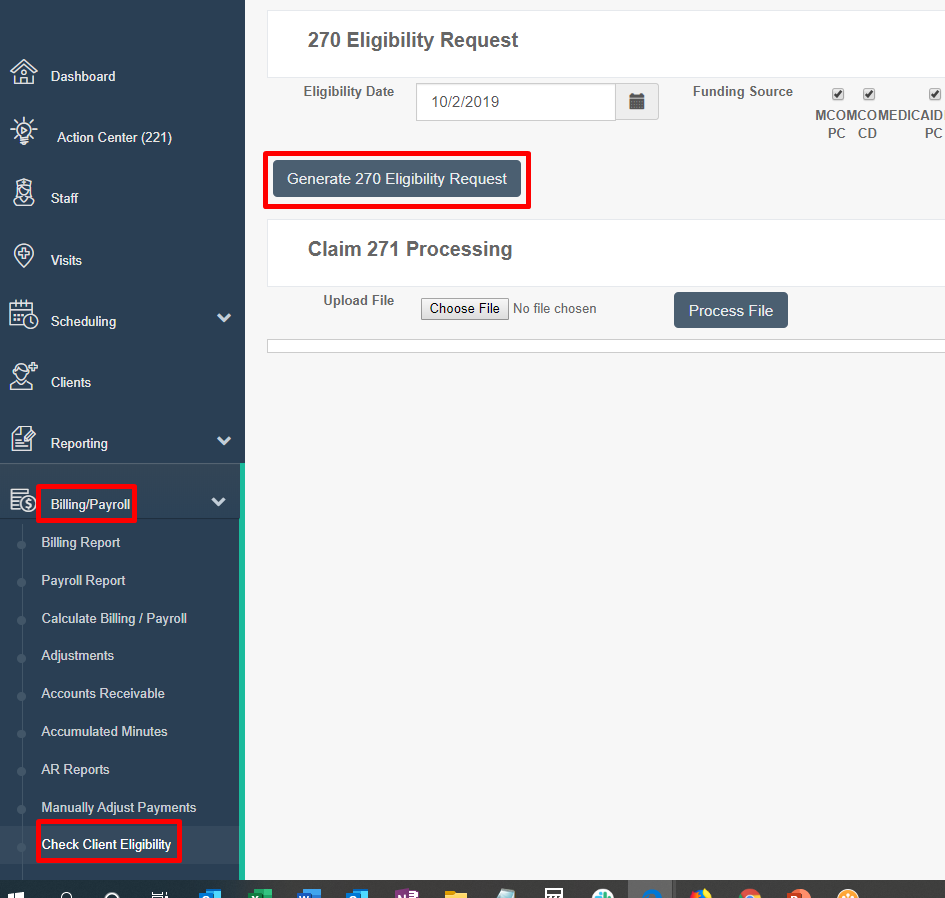
This file should be uploaded in your usual insurance portal.
Uploading an Eligibility Check Response (271)
The reply "271" can be uploaded once it is received in the same location. Once uploaded, it will publish the results below the upload portal for your review.