

Goods and Services (sometimes used as a Cost Sharing / Copay Model)
Overview
The Goods and Services functionality in Ankota can be used to manage unique goods or services that require a special budget or payment management.
Cost sharing, a form of copayment, is a situation where the client must pay a copayment per month up front, usually each month for the year at a regular rate. The amount may change at the start of each year. (This is common in Georgia.) They then bill the rest to the state. The Goods and Services module can be used for this payment management as well.
See below for guidance on understanding and managing this process in Ankota.
This article includes:
Understanding Goods and Services
Understanding Goods and Services
The fundamental process begins with the visit category for a Good, Service, Cost Sharing, or Copay being built. Then a visit type is set up and associated with that visit type category. Then the main menu module, typically named Goods and Services but also potentially named Cost Sharing or Copay, is turned on in the Main Menu at left.
Then under the main menu access, the client is assigned an authorization for the visit type. (This authorization can also be made on the client's profile under the Authorize Units tab.) With that authorization in place, you can click Create a Payment (which in this case is really to create a visit, in order to request a payment), which actually creates a visit with a billable dollar amount, which can be sent to the client.
Authorizations
This authorization can be entered either on the client's individual Authorize Units tab in their client profile, or it can be added via Goods and Services.
To add the authorization via the Goods and Services module,
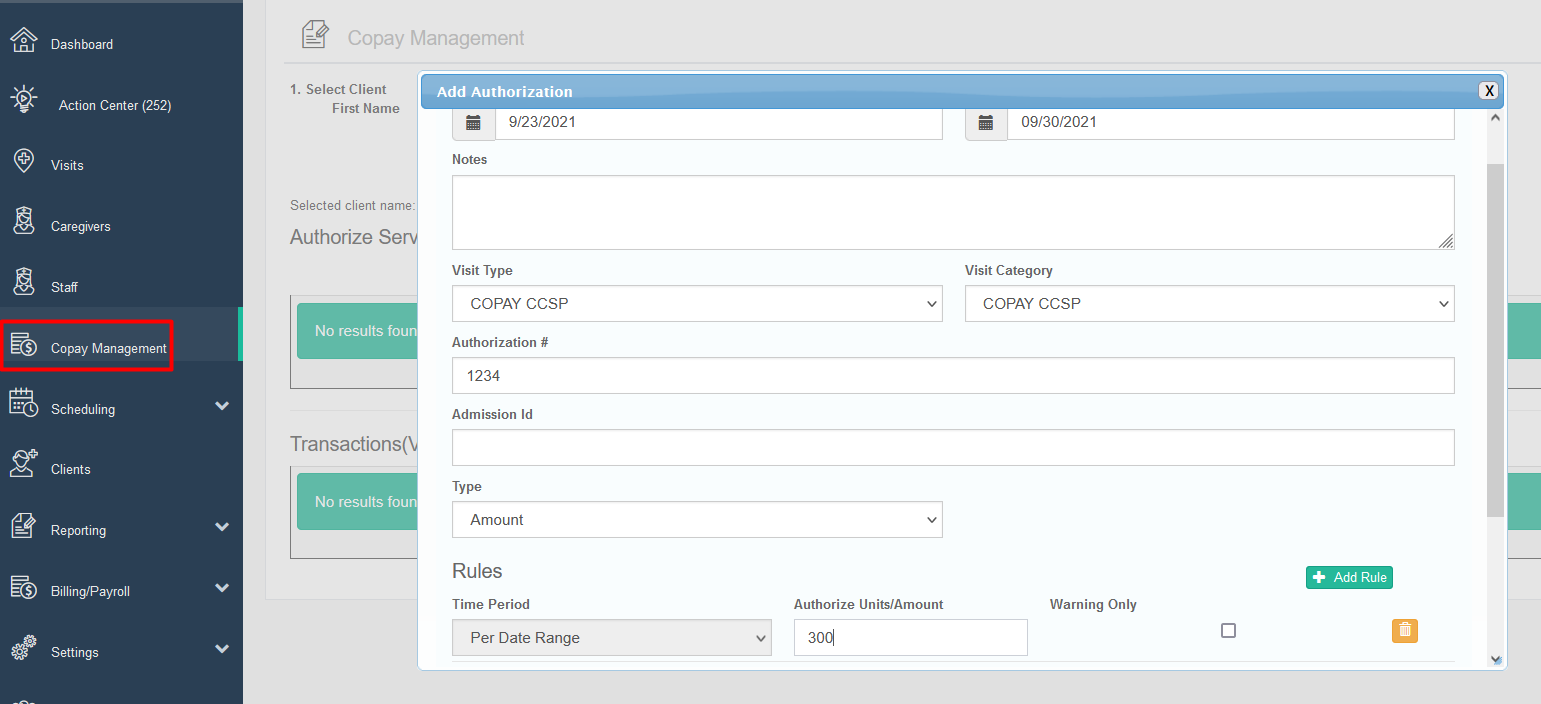
- Click Copay Management in the left Main Menu
-
Enter the client's name, then click Search Client
- If you already have the authorization, you can skip to the next step
- Click the Add New button under Authorize Services
-
Add the authorization, working top to bottom
- You can enter this on a monthly basis, or enter the yearly amount and then create the monthly invoice as needed
- Admission ID is not necessary
- Be sure to enter the Type: as an amount
Creating the Invoice
To create an invoice, you'll again use the Goods and Services system. This functionality allows you to create an invoice for an associated authorized copay at the click of a button.
To create the copay invoice,
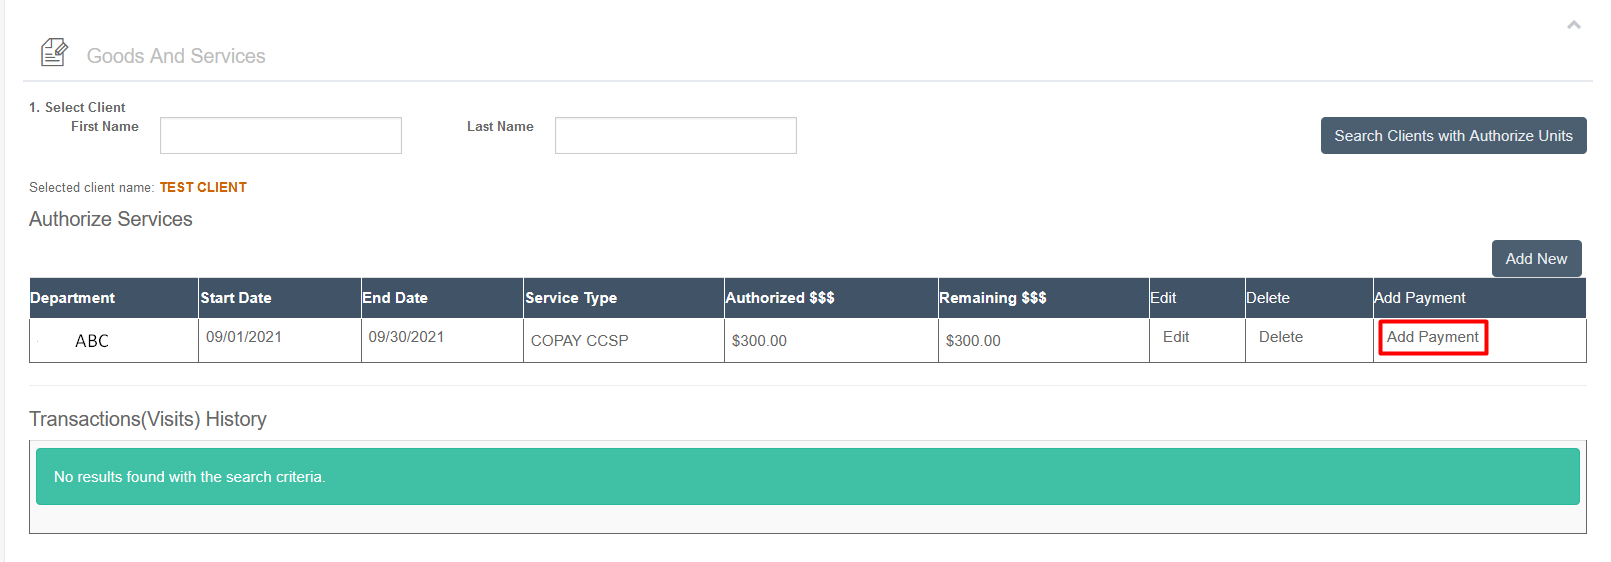
- Click Goods and Services (or Cost Sharing/Copay) in the left Main Menu
- Enter the client's name, then click the Search Clients with Authorized Units button
-
On the specific authorization, click Add Payment
-
Enter the date, description, and amount (leave Service Code as defaulted)
- The dollar amount must be entered as a whole number (10, not $100.00)
- This will create a transaction history on this page, and a billable visit on the Calculate Billing/Payroll page (operation: Billing)

Billing
Once the visit has been created, you can proceed through your usual billing processes (Calculate Billing, then approve the draft on the Billing Report page).
NOTE: FOR CUSTOMERS WITH MCOs, you will need to change the payer descriptor on the Copay visits to Private Pay. Otherwise, it will bill the copay to the payer descriptor at this time. Development to come.
Once you have created the invoice, you may wish to use the Email Invoice to Client button to email the invoice. Please note the client must have a valid email for this function to work. If this button is not already configured for your organization, this configuration can be requested.
Alternately, you can print and mail the paper invoice.
Processing Payment
When you receive the check or other payment from the client, the best practice is to apply the payment to the invoices that were billed, typically through the Accounts Receivable screen.