

Sandata Data Delivery & Visit Management
Overview
Per state requirements, Ankota directly feeds required data to Sandata, a data aggregator serving numerous states, based on complex technical specs. This data becomes part of a library of data made available to the state for internal monitoring. (The content and format of this data is determined by the state in accordance with federal law.)
After reviewing the data, Sandata sends Ankota responses confirming the acceptance or rejection of those visits. If the visits are rejected, Sandata will usually provide a brief explanation as to why. Ankota logs those responses in your Visit Approval Dashboard for your review. Rejections are also highlighted on the Ankota Landing Dashboard.
Most "Accepted" visits will then be "Verified." Verified means the visit is billable. Some visits, however, will say "Processed." In some payer set-ups, Processed may remain the final EVV status within Sandata, even after billing continues elsewhere.
Billing is sometimes completed through Sandata, and sometimes through 837s, depending on the state and payer.
See below for more information on data delivery, responses, and corrections.
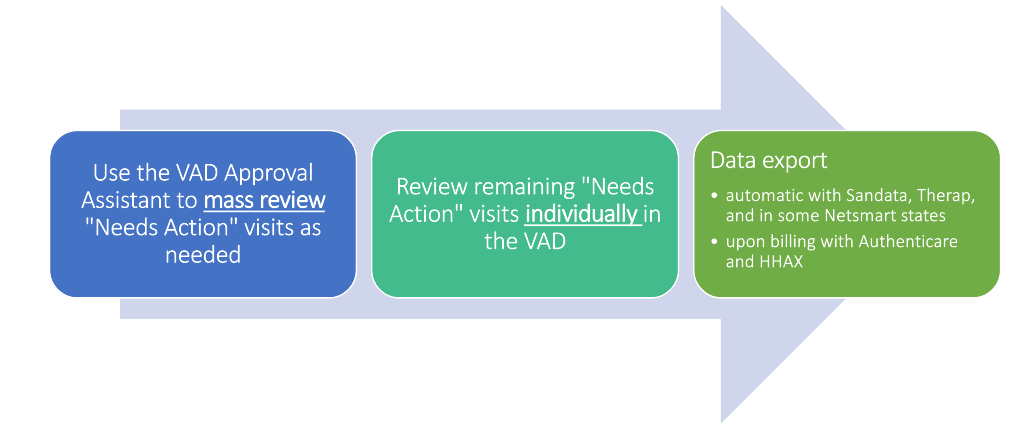
The critical workflow to understand is:
Use the Landing Dashboard to identify and complete needed actions
-
Use the Approval Assistant to review your Needs Action visits
You will have very few rejections if you follow this process
Ankota will automatically export your Passed Screening and Approved visits as appropriate
-
Check for Responses
-
Make sure you have a status of Accepted for all exported visits during your first export
Most "Accepted" visits will then be "Verified" in Sandata. Verified means the visit is billable. Some visits, however, will say "Processed." In some payer set-ups, Processed may remain the final EVV status within Sandata, even after billing continues elsewhere.
-
Check for exceptions in Sandata prior to billing
Checking for exceptions prior to billing is critical in states where exceptions can cause visits to be unbillable, such as Missouri
-
In most cases,
Omit the visit with exceptions/in status Incomplete (either in Sandata or, if you do not have the Omit option, contact Ankota Support)
Make the correction to the visit
Change the Visit ID in Ankota using the Add to Visit ID button (which will add a character to the end of the visit ID, making it a "new" visit ID)
-
Export the updated visit
NOTE: if you scheduled the wrong client, this is a fatal error; you must cancel the visit and create a new billable visit
Make sure new clients and caregivers are checked after their first visits to ensure data is exporting successfully
-
-
Manage your Rejected visits on the Visit Approval Dashboard by reviewing the rejection, correcting, and manually re-exporting
If you suspect the Approval Assistant wasn't used to review the visits before sending, you can double check the rejected visits in the AA
-
If there was incorrect data entered by an admin resulting in billing the wrong visit type or duration,
You can usually correct all errors by making changes, then marking with a new Reason code prior to re-exporting the visit
-
If Sandata will not accept the update,
Send BillVisit as false or mark as Omit/False in Sandata
Make the correction to the visit
Change the Visit ID in Ankota using the Add to Visit ID button (which will add a character to the end of the visit ID, making it a "new" visit ID)
-
Export the updated visit
NOTE: if you scheduled the wrong client, this is a fatal error; you must cancel the visit and create a new billable visit
Bill via Sandata or 837 as appropriate when visits are accepted
INDEX
Data Management Best Practices
Essential Transportation / Essential Errand / Shopping
Data Preparation
Data preparation typically covers the following:
Adding missing data entry
Adding missing (reason, bypass, or exception) codes
Unexpected duration requiring approval or change
Individual review of some visits with unique issues
Visit Approval
To speed up this process, Ankota usually recommends using the Approval Assistant in the Visit Approval Dashboard to rapidly identify missing data, missing codes, and duration issues prior to approval. Any remaining unapproved visits can be individually reviewed, and then data is delivered.
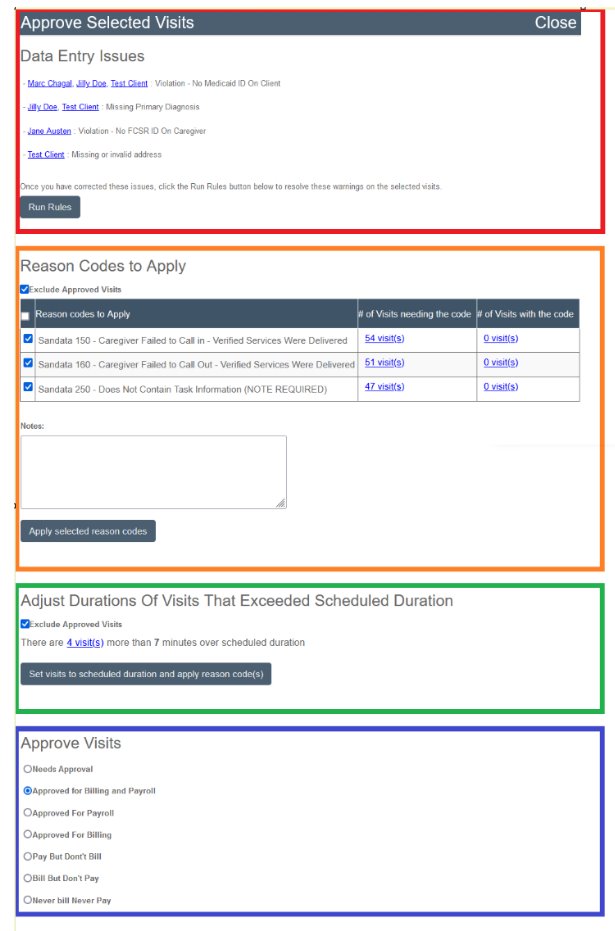
The Approval Assistant
The Approval Assistant is used for mass review of Needs Action visits. It has four key sections:
The Data Entry section catches missing data. It will link you to the profiles of clients or caregivers missing information along with telling you what is missing.
The Codes section will make coding suggestions as appropriate for your state and aggregator and resolves the related red warnings. This section particularly speeds up the review process.
The Durations section will help you make duration changes if necessary. This is a powerful section primarily intended for private pay and CDS.
The Approval section allows you to approve visits with no red warnings left. (Visits which still have red warnings will not be approved.)
The Approval Assistant resolves the majority of all issues that require attention or changes in order to be accepted by Sandata. The most complex step is typically coding. Coding requires the admin to recognize the errors that occurred and apply a code to reflect the error, which will result in the state accepting the visit. Most errors which would cause a rejection can be prevented with a code. The most common codes will automatically be suggested by the Approval Assistant. Missed coding is the most common reason for visit rejection, so it is always beneficial to use the Approval Assistant.
For more on the Approval Assistant, or to watch one of our Ankota Approval Assistant seminars, click here.
Individual Visit Review
After completing a review of Needs Action visits with the Approval Assistance, wait a few minutes before refreshing your Visit Approval Dashboard to pull up all remaining Needs Action visits. There should be significantly fewer visits remaining.
Next, walk through each visit individually by clicking the paper-and-pencil "Edit" icon (
) and reviewing the red warnings which could not be resolved by the Approval Assistant. Typically these are unusual warnings. Resolve them, make other adjustments as needed (see additional notes below), then approve the visit, and your visit will be exported.

Regarding other visit adjustments, those will vary based on the visit. Actions may include:
Reviewing unresolved red warnings
Fixing the issues the red warnings flagged
Marking the red warnings as reviewed/completed (turning them green)
-
Correcting times if needed
always click Save Visit Details to recalculate billable/payable after adjusting times
Reporting care plan items if needed
Checking the Close Visit box if needed
Adding coding if needed
Approving the visit (even if it is approving it to be Never Bill/Never Pay)
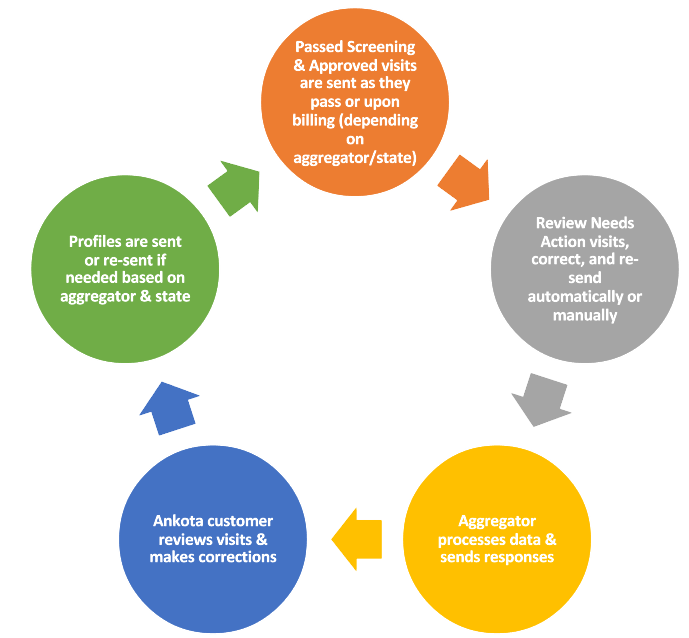
Data Lifecycle
The Ankota/Sandata data life cycle is initiated by visits passing screening or being approved in Ankota. Appropriate, state-required visits are then sent to Sandata, who reviews them and sends feedback to Ankota.
During the start of data delivery, data should be checked to ensure it is exporting successfully. This should be repeated with any new clients or caregivers.
Any rejected visits are then reviewed by the Ankota user in the Visit Approval Dashboard, corrected, and re-sent to Sandata. (Rejected visits are much rarer when customers use the Approval Assistant on Needs Action visits.)
Data Management Best Practices
Prepare Appropriately
Fill out all the necessary fields prior to scheduling visits for clients or caregivers
Regularly work through the Visit Approval Dashboard so issues don't pile up
Use your Dashboards
Check your Landing Dashboard regularly
Complete the action items visible there (manage your visits)
Use the Approval Assistant Wisely
-
Work through Needs Action visits one category at a time
-
If you have Missouri Errands, review visits with Errands first
-
-
The approval assistant works best for groups of Needs Action Medicaid visits which must be delivered to an aggregator
The Approval Assistant can be used with non-Medicaid visits for cleaning and visit management, but it was not designed for those visits
-
You can use the Approval Assistant to review Rejected visits if you suspect the Approval Assistant was not used to begin with, and key steps were missed
But be sure to filter appropriately if you are reviewing Rejected visits
-
Work top to bottom in the Approval Assistant
Give each section time to process
Manage your visits first, then approve

Data Responses & Rejections
Integrated Responses
Aggregator responses (rejections and acceptances) are automatically integrated into your Ankota Visit Approval Dashboard. Depending on the size of your data delivery and the timing of your export, you could see responses anywhere from a few hours later to a day later.
The exported data statuses will be shown as the data progresses:
No Response means the data was not sent or not successfully sent
Sent to Export indicates the file was created and queued for delivery
Sent means the formatted file has been transmitted
In Process means the data was confirmed as received by the aggregator/clearinghouse and is now under review
Rejected or Accepted is the final status of all successfully exported and processed visits
-
N/A is a special selected status where Ankota users can erase the export status history and set to N/A
This is typically used when a visit is accidentally sent over with an override, such as accidentally sending a private pay visit over
-
Hidden responses:
Sandata may accept a visit, but silently make it unbillable; see more below
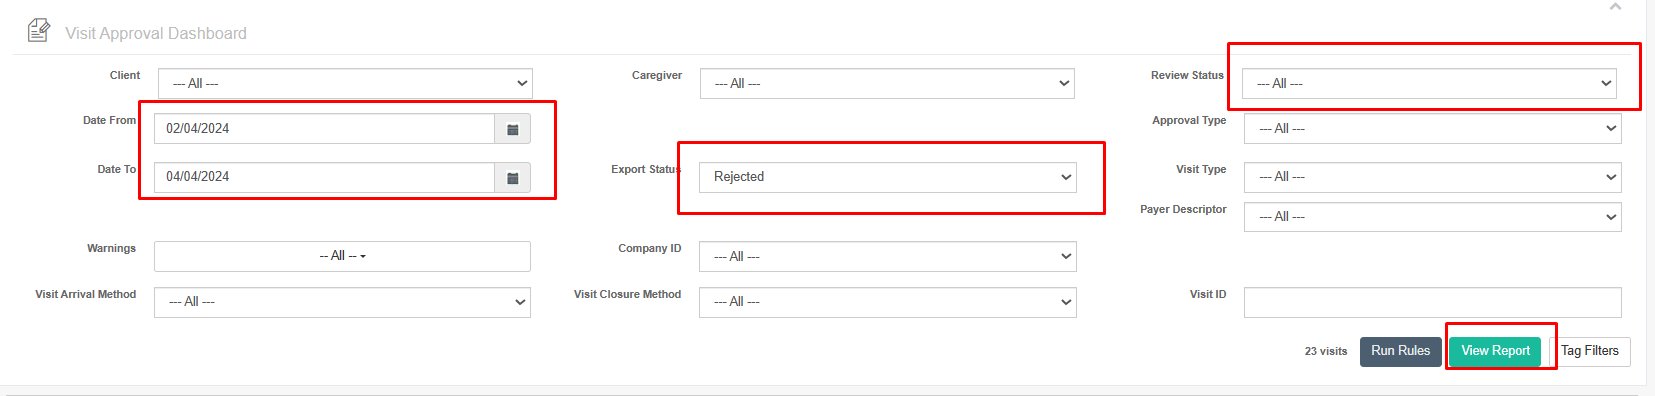
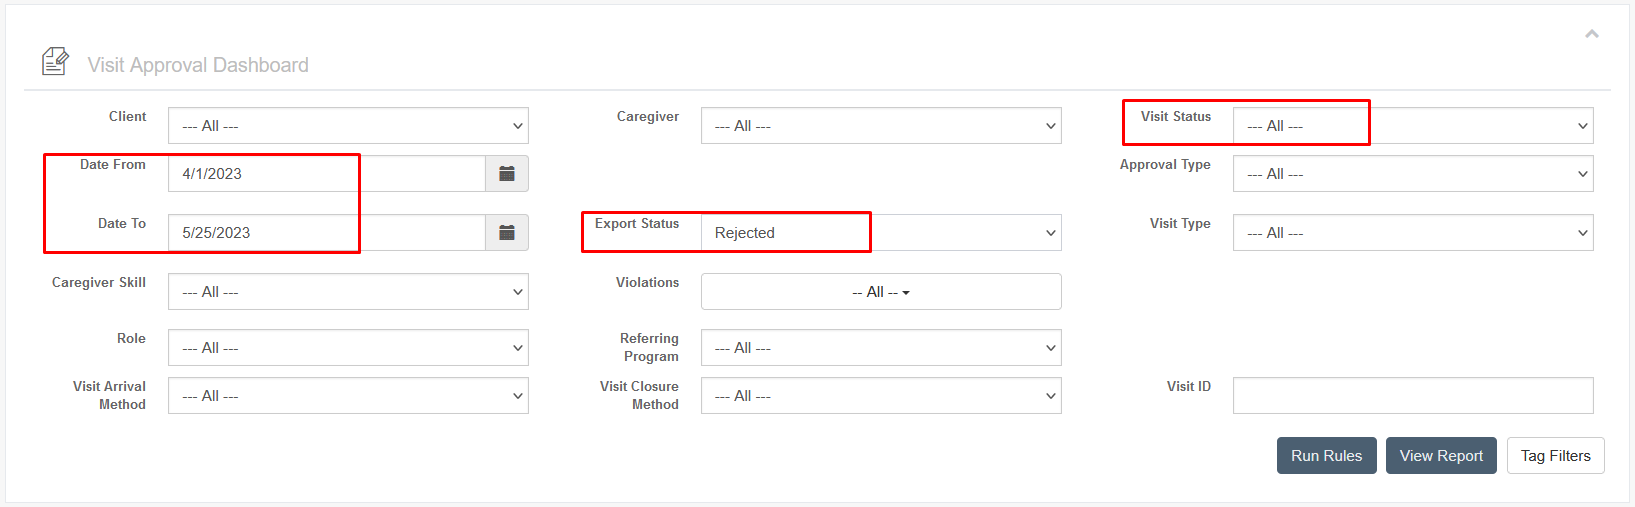
Your main concern will be to check for rejections, view the errors, make corrections, and export them. You can filter your Visit Approval Dashboard by Date and Export Status to view your rejected response files (make sure your Ankota Visit Status is in Status: All):
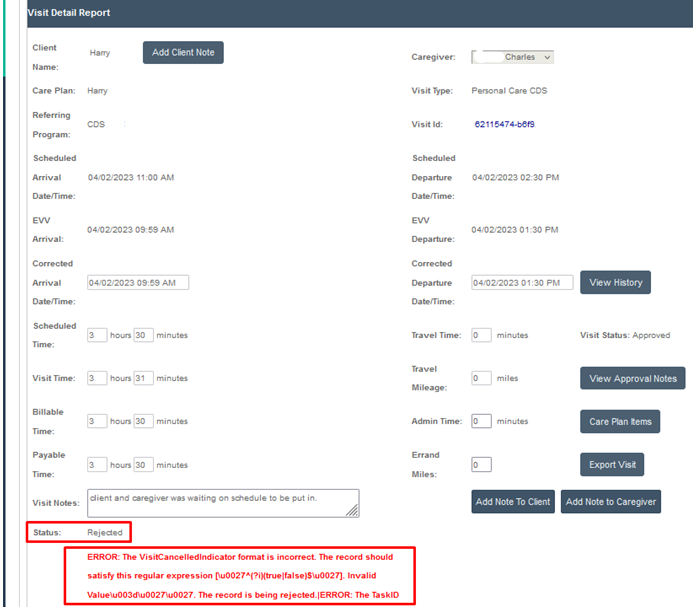
The errors will show specifically in the visit details under Status, as in the screenshot below.
Rejections
Rejection Reasons
Visits can be rejected for a number of reasons, but typically it is one of the following:
-
Client or caregiver data is wrong or missing
The Approval Assistant's Data Entry section helps prevent missing data errors
The client is not authorized to bill this payer or visit type for the service date
-
The visit has a basic EVV error and requires coding to allow acceptance by the aggregator
The Approval Assistant's Coding section helps prevent missed codes
The errors will show specifically in the visit details under Status, as in the screenshot below. You can make corrections as needed and re-export.
For more guidance on rejection reasons and how to proceed, see the Corrections section below.

Accepted with Exceptions
Sometimes visits will be accepted by Sandata, but with exceptions. Exceptions do not show in Ankota, only in Sandata. In some states, visits with exceptions are still billable; in others, they are not.
Missouri Exceptions:
As of 4/1/2026 in the state of Missouri, most exceptions cause visits to be Incomplete and therefore unbillable.
The most common exception causing unbillable status is missing care plan items on visits requiring care plan items
-
Ankota has added a safety net to help prevent these unbillable visits:
If a visit type requires care plan items
And the visit is missing care plan items
Ankota will not deliver until at least one care plan item is completed
To locate exceptions, log in to Sandata on Demand and navigate to Visit Review. Enter your date range and select All Exceptions. This will display any exceptions returned by Sandata. Click into each exception to view the specific details for that visit.

After the criteria for the search is made, the report will show below. Scroll to the right and click on the eye icon.

Because Ankota typically flags visits that are missing care plans—and caregivers cannot close visits without completing care plan items—these types of exceptions should be uncommon.
In order to correct this, you have two options: coding the visit as missing tasks (accepting the error and moving on), or adding the care plan items and doing a special export of the visit.
Coding And Re-Export Visits without Care Plan Items/Tasks
Coding and then re-exporting visits without care plan items is the best path if you are unsure what tasks were completed on a visit.
By coding the visit and approving the visit, Ankota will allow you to re-export the accepted visit.
To make the correction:
Do NOT add care plan items
Mark the visits in Ankota with reason code Sandata 250 – Does not Contain Task Information
Approve the visit
Export the visit
Correcting, Re-setting, and then Export Visits with Care Plan Items
In the case where you have the care plan completion information and would like to make care plan corrections, the process is as follows:
Correct the missing care plan items on visits (typically through the Visit Approval Dashboard, inside the visit details, Care Plan Items button)
-
Re-set the visit status
This can be done either through a Support ticket request, or, in the case of repeated corrections, we can provide a re-set override
Re-export the visit
Contact Support if you need assistance with this process.
Rejection Corrections
Once you know the error (visible in the visit's rejection details), you will correct the errors as needed and then re-export the visit(s). This may involve adjusting reason codes in the Visit Approval Dashboard before re-exporting a single visit, or completely backing out billing and payroll in order to correct a fundamentally wrong visit (with wrong visit dates, time, visit type, client, or caregiver) before re-exporting the visit.
Some common errors and the actions to take are outlined below.
Error |
Meaning |
What to Do |
Request Failed With An Exception |
This visit was coded (most commonly a reason code, such as 160 - Caregiver Failed to Call Out), but the visit did NOT need the reason code |
Remove the unnecessary code and re-export |
A visit row exists in stx.visits table (by account/visit_id) and no changes are specified |
This visit was sent a second (or third, fourth...) time, but there is no reason provided as to why it was changed, so it was rejected. |
If you sent the visit by accident a second time and you do not need to update the visit, do not change anything. If you did want to re-send the visit, reason code the visit and then re-send the visit. |
Reason code error |
The reason code was wrong/missing. |
|
Employee not found |
The employee's file did not successfully transfer. |
Update your employee profile so that it includes all the required data for your state, then export the caregiver again. If needed, re-export any billed visits the caregiver had completed either by moving invoices to draft and then back to completed, OR by exporting from the Visit Approval Dashboard manually. (Filtering for the employee on the Visit Approval Dashboard, selecting all visits, and then clicking Export is usually the fastest way to export for employees.) |
The VisitChanges segment cannot be empty when Call Type is Manual. The record is being rejected. |
A visit was completed manually but was not managed as a manual visit. (This visit was not reason coded even though it had an issue with EVV. In states where action codes are also needed, you need to add an action code as well.) |
Code the visit appropriately and re-send the visit. This will ensure that the changemadeby, changedatetime, reasoncode, and changereasonmemo (visitchanges segment) fields are supplied to Sandata. |
Client not found |
The client's file did not successfully transfer. |
Update your client profile so that it includes all the required data for your state, then re-export the client. If needed, re-export any invoiced visits the client had completed by moving invoices to draft and then back to completed, OR by exporting from the Visit Approval Dashboard manually. |
The EmployeeIdentifier format is incorrect. |
The FCSR ID is missing/wrong. |
Correct the missing/wrong FCSR ID (the most common error is entering the longer confirmation code, as opposed to the 8-digit actual FCSR ID), then export the caregiver again. If needed, re-export any billed visits the caregiver had completed by moving invoices to draft and then back to completed, OR by exporting from the Visit Approval Dashboard manually. |
The ClientCity format is incorrect. |
The client's city is incorrectly formatted. |
Correct the client's city, then re-export the client. If needed, re-export any invoiced visits the client had completed by moving invoices to draft and then back to completed, OR by exporting from the Visit Approval Dashboard manually. |
Client Not Found. Clients must have been previously received from Payer to be updated via Alt-EVV. |
The client profile is not found in the database for this payer, such as Medicaid. |
In most states, the client's name, Medicaid ID, and DOB are used to match clients against a database. First, check to make sure all of that data is correct and exactly matches the client's authorization. Second, make sure the client truly is assigned to this payer, and not accidentally a private pay client scheduled to Medicaid visit types, for example. If the data for the client is correct and the payer is also correct, then you should check in with the payer to see why this client is not on file with the payer. |
The ChangeMadeBy value is incorrect |
Missing email address |
Check company email address in Organization Detail and staff/admin email address in profile and confirm they are valid. Please re-export once resolved, either by moving invoices to draft and then back to completed, OR by exporting from the Visit Approval Dashboard manually. |
Error during retrieving service_id entered |
Wrong HCPCS code (wrong visit type) |
Confirm the correct visit type was scheduled for the client. If it appears correct, double check the authorization. Adjust as needed and re-send the visit. (NOTE: in 2025, Massachusetts retracted requirements for data delivery of many visit types depending on program/payer/visit type combination. If you previously sent visit types that are now being rejected with this warning, contact Support.) |
The ClientIdentifierOnCall cannot be null |
Wrong/missing Medicaid ID |
Confirm the Medicaid ID is not wrong/missing. Correct if needed; re-export the client and then export the visits from the Visit Approval Dashboard. |
Cannot handle import due to \u0027Fail to save data due to \u0027com |
There was an error in data being sent |
Re-export the visit to resolve this issue. This should not occur often. Reach out to Ankota Support if this continues to happen. |
Account Inactive |
The account was suspended due to inactivity |
Reach out to Sandata support to get the account activated. Once activated, export the caregiver/client and visits. |
If you receive a rejection reason not on this list, please reach out to your Ankota specialist for more information.
Other
Essential Transportation / Essential Errand / Shopping
For transport care plan items, Ankota users have the option to turn on an Ankota warning, "Visit with Essential Transportation or Errands at Arrival or Departure not at Client Location." Please note this feature requires configuration and is typically used only with Missouri Sandata visits. Generally, you will want to filter for visits with the Errands warning and manage them BEFORE using the Approval Assistant. This is the only exception to the general "Use the Approval Assistant first" guideline.
This warning works as follows:
Request the function be turned on
You must define a maximum distance allowed for transport care plan items
This warning will only be applied to visits where Essential Transportation, Essential Errand, or Shopping is a care plan item on the visit
The visit will be flagged in Ankota when it is outside the geofence (typically 0.1 miles) but under the maximum for transportation (typically 25 miles) COMING SOON
After the visit is flagged in Ankota, users will be able to quickly use the Approval Assistant to code the visit appropriately so that visits outside the visit location can be reason coded and exported.
Alternately, users can filter for the warning and then review the visits individually for coding and approval.
