Authorizations
Overview
Medicaid and V.A. clients will be provided with plans from the state authorizing appropriate care plan items and hours. (Alternately, if a client is private pay, your organization will have contracted hours with the client, which you may wish to track via authorizations).
General client set-up is to first enter demographics, then authorized units. By adding this authorization, the Ankota system will not only track the client's used units against the authorization and prevent over-billing, the authorization will also be provided as a reference when scheduling.
This article includes:
Editing Units on Active Clients
Scheduling without an Authorization
Notify Caregivers of Remaining Authorization in Telephony/Mobile App Ionic
Authorization Flags on Individual Client Calendars
Standard Authorizations
Adding an Authorization
To begin, go to the Authorized Units tab within the client's record.

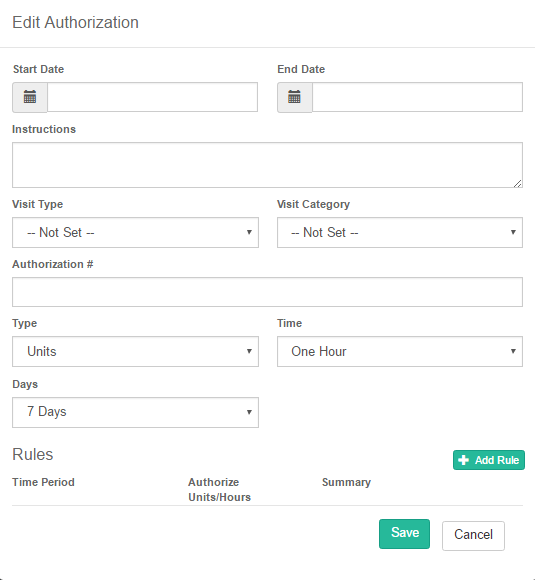
Next, select + Add New and enter the Start Date and End Date as well as the other authorization information. A client may have one or several active authorizations, so long as there is no more than one active authorization per visit type.
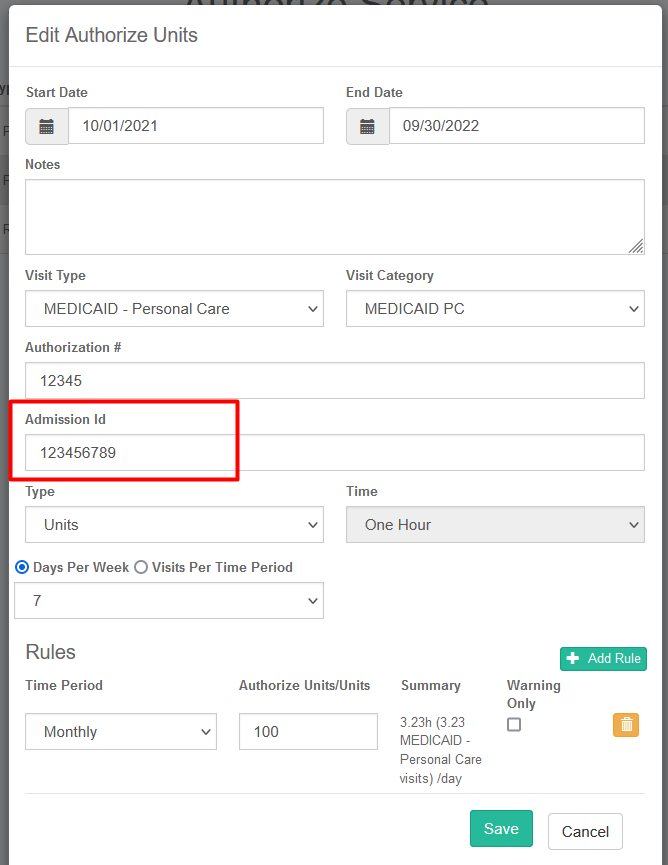
Please note that in your environment, an Admission ID may also be necessary on your authorization.
Note that for historical records, when a client receives a new authorization, you should enter an end date in the previous authorization and begin a new authorization for the updated contract. You can add any necessary instructions in the Instructions box. Otherwise, add or select the information in each window from top to bottom.
NOTE: Do not overlap your authorizations. Overlapping authorizations will result in billing errors.
Admission ID
Depending on your organization's needs, the admission ID may be required or not. Virginia Medicaid providers, for example, will always need to enter the billable ID in the admission ID field. Other states need the admission ID entered for export reasons.
If you have been directed to enter the admission ID, be sure to enter the billable ID (such as the Medicaid ID or MCO ID) in this field consistently in all authorizations. Otherwise, you will not be able to successfully bill. In some cases, your data will not even be accepted by the clearinghouse without this field being filled out.
Defining Rules
After you have entered the basic authorization information, you will also need to define the rule of the authorization. To do so, follow the directions below.
With the authorization open, scroll to the bottom. Next,
- Select + Add Rule
- Enter the time period through the drop-down
- Enter the authorized units
- A summary of hours per day will be calculated based upon the data in the rules, the type and the time
- This is only a summary and a suggested guideline.
- Save

Editing Units on Active Clients
To edit units on active clients,
- Click Clients
- Select the client
- Click the Authorize Units
- Click Edit
- Scroll to the bottom, edit the number of units, press tab to see units per visit, then click Save.
Authorization Transition
Here's a two-minute video on authorization transition (also known as visit type automation).
For additional details, read the write-up below.
One issue many private pay and CDS clients face is that of transitioning from one authorization to another. For example,
- After 250 units of Personal Care CDS per month, the client should transition to Personal Care CDS ILW
- After 20 hours of Standard Level visit type, additional private hours should become Standard Level (Bulk Discount) visit type
The authorization transition function allows users to clearly connect two visit types. This is done as follows:
- Create two authorizations
- In the "originating" authorization, select the next visit type in the Auth Transition section
- When the time period and units are completed, the system will transition to the next authorized visit type
- All other visits for the authorized period will then convert to the next visit type
To provide a practical example:
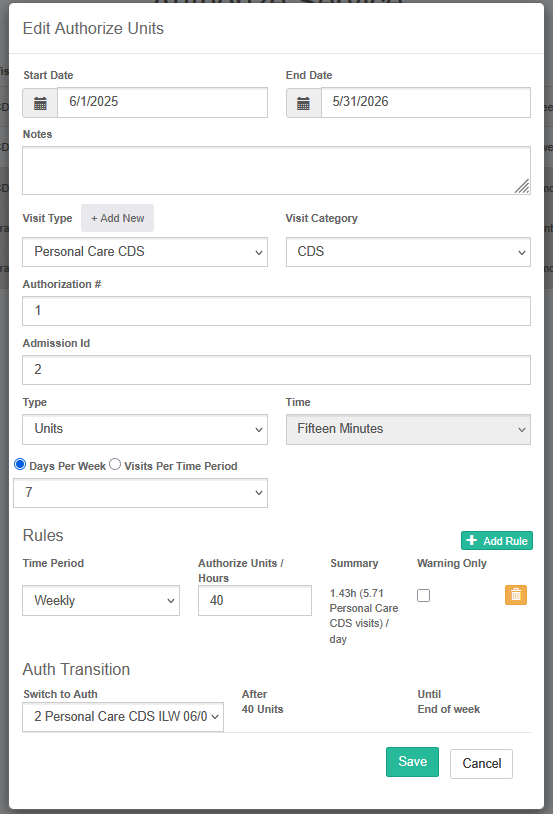
- Below is a Personal Care CDS authorization for 40 units weekly
- It has been connected to a Personal Care CDS ILW authorization
- After 40 units per week, the visit will split and a new Personal Care CDS ILS visit type will be created
- The rest of the week's visits will also be converted to Personal Care CDS ILW per the linked authorization


Scheduling
Scheduling without an Authorization
You can schedule without a true authorization. In some states or by request, your visit types may be defaulted to require an authorization, but not an authorization number. In other words, even if you are required to include an authorization, Ankota only turns on the requirement for an actual authorization number by special request. You can simply put in "placeholder" in the authorization number field and fill it out later.
So to clarify, there are three options:
- Schedule without an auth for visit types that do not require one (such as office management visit types)
- Schedule with an auth that has "placeholder" in the authorization field (most regular Medicaid visit types)
- Override: system requires an actual number (turned on only by request)
Notify Caregivers of Remaining Authorization in Telephony/Mobile App Ionic
To configure:
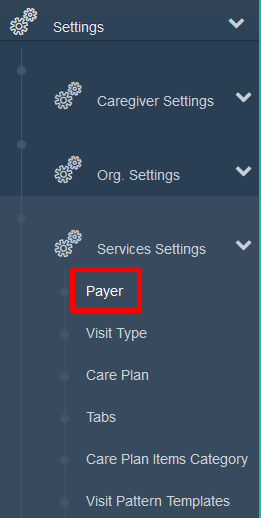
- Go to Settings
- Service Settings
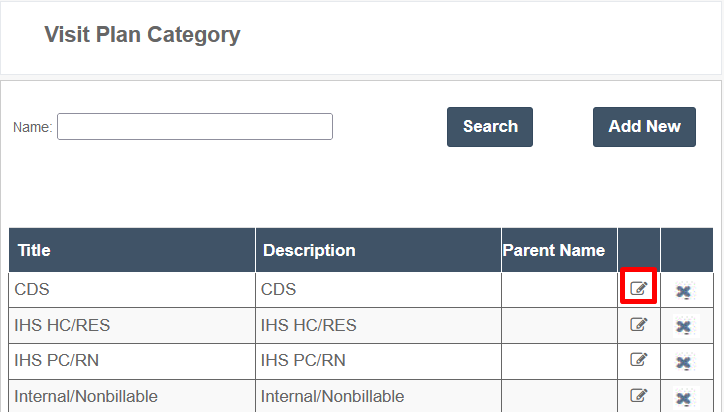
- Payer (could also be listed as "visit plan category"
- Select a category and EDIT
- Scroll to the bottom and check configuration: Notify Caregiver of Remaining Authorization in Telephony/Ionic Mobile App
- Click Save
Authorization Flags on Individual Client Calendars
One option for managing authorizations is to have them reflected on individual client calendars.
These authorizations reflect active authorizations, specifically the units that are scheduled, used, and remaining as well as the critical date range, visit type, and the approved units.
One blue banner reflects each individual authorization rule. If an authorization has more than one rule, such as 50 units/week but 2,000 units for the complete date range, two banners will be shown.

Video
Authorizations - Video
For the next step in adding a client, go to Care Plans.

