Exporting a Merged Health Care Claim
Overview
Many clearinghouses (such as Availity, Waystar, Office Ally, etc.) and state portals (Georgia, Missouri, etc.) allow for uploaded EDI files for fast billing. If you have access to one of these, then once you have worked with an Ankota specialist to set this process up, your Ankota environment will be configured for it. This means that at a click of a button, you can create the correct EDI file, ready for upload.
See below for further details on this process.
Pre-Export
To ensure you are ready to export an EDI file for billing, simply perform your usual visit review and billing processes in Ankota. In other words, after ensuring visits are closed, reviewing the Visit Approval Dashboard, calculating billing, and completing draft invoices, you will export the Merged Health Care Claim.
Multiple Visit Types Same Day with the Same Client
Sometimes, the same client receives a visit type at multiple times per day. For example, they may receive Personal Care T1019 at breakfast, where they are assisted with dressing, grooming, breakfast, etc., but that caregiver (or another caregiver) may also provide Personal Care T1019 during the evening, where they receive assistance with their evening routine. If you do not bill all visits for that client and that visit type on that day on the same 837, subsequent claims for that day's visit type will be rejected.
In order to bill these separate visits successfully on the same day in 837P files, and to prevent billing one completed visit in the morning when the second visit is still unapproved and in limbo in the Visit Approval Dashboard, customers should ensure all visits are ready to bill for the selected date range before billing. This means all visits in the selected date range should be Passed Screening or Approved status, i.e., out of Needs Action status in the Visit Approval Dashboard.
For customers who wish to have an extra safety net, Ankota has an optional safety net which can be turned on by request. This safety net prevents invoices from moving to completed status if their "partner" visit or visits is not ready to bill.
For more information, click here.
Exporting the Claim
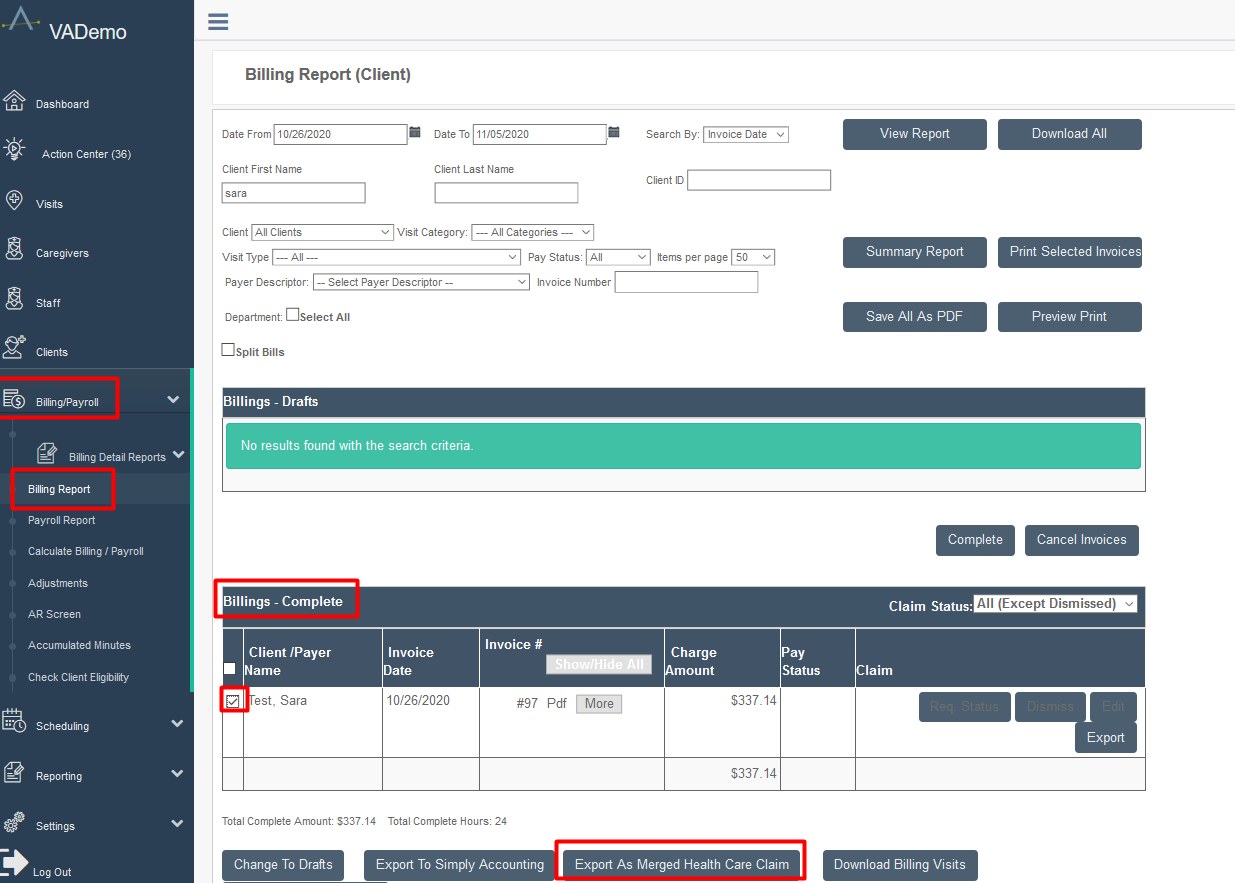
To export the merged health care claim,
- Go to the Billing Report page
- Filter for your appropriate completed invoices
- Select the invoice or invoices by checking the boxes next to them
- Click the Export Merged Health Care Claim button
- The file or files will save to your computer, usually to your Downloads folder, with the name Claims_Merged_Year_Month_Day_Time_Seconds.edi (for example, Claims_Merged_2020_11_05_08_12_52.edi)
- Depending on your needs, the files may render as one or more files
You may then proceed to opening the portal (clearinghouse, state portal, etc.) where the EDI file can be uploaded, and then upload the appropriate file or files.

